Is the NextGen DataDisplay legal?
Is the NextGen DataDisplay legal?
It depends on the installed software version and the enabled functions.
Street-Legal version
With the Street-Legal software version, the NextGen DataDisplay is a diagnostic and display device: it reads data from the vehicle’s onboard network, shows it, and can execute diagnostic functions. This version does not include exhaust flap control and is therefore generally uncritical for normal road use.
Full version
The Full version additionally allows exhaust flap control. Depending on the country/region and the vehicle, this function may not be permitted. In some cases, authorities may object to the mere presence of this function even if it is not activated.
How do I know if I have “Street-Legal” or “Full” installed?
In the main menu go to Settings → Extras:
-
Street-Legal: There is no menu item called “Exhaust Flap”.
-
Full: The menu item “Exhaust Flap” is present.
If “Exhaust Flap” is visible, legality may be questionable depending on local rules, even if the “Enable” checkbox is not set.
What is “Soundtuning” and does it make my display illegal?
“Soundtuning” is BMW’s name for the function that creates burbles/crackles in Sport or Sport+ mode. The NextGen DataDisplay cannot increase or activate this function. It can only make the vehicle quieter by disabling it.
No ECU maps are changed, and the NextGen DataDisplay cannot modify engine calibration in any way. The Soundtuning feature is not related to road safety regulations.
Notes
-
Legality can vary by country, region, vehicle model, and inspection rules.
-
Local laws and the assessment by inspectors/authorities are always decisive.
-
If you want maximum legal certainty, use the Street-Legal version.
-
For questions regarding legality in your country, we recommend contacting an inspection organization or the responsible authority in advance.
-
The vehicle owner/user is responsible for use on public roads.
FAQs From Same Category
Hier ist die Update Anleitung für ein Update mittels Windows.
USB Update (USB Flash Drive)
Starting with version 1.53 (including Bootloader 1.0), you can install updates directly from a USB flash drive.
What you need
- USB adapter (female/female)
ORDER (Amazon affiliate link)
- USB flash drive
ORDER (Amazon affiliate link)
Prepare the USB drive
- Format the USB drive as FAT32 or exFAT (both are supported).
- Copy the update file to the USB drive (root directory only, not inside a folder).
- Rename the file to: AKNG.srec
- Note: A boot image created with the Bootlogo Creator can also be used.
Start the update
- Connect the adapter and USB flash drive to the USB update cable.
- On the display: Settings → System → Update
- Select USB Flash Drive (not “Computer”).
- The display turns off briefly – the update starts automatically.
Duration: Updating via USB typically takes about 4–5 minutes.
Status indication (backlight blink code)
- Very fast blinking: No USB flash drive detected. After about 10 seconds, the display boots the normal software again.
- Fast bright / slow dim: Update in progress.
Important notes if the update is interrupted
- If the USB drive is unplugged during the update, the bootloader restarts and waits again for a valid USB drive.
- If ignition is switched off or power is lost, the update must be started again.
- Important: If an update has started and gets interrupted, the device may no longer boot into the app and will stay in bootloader mode until a successful update is completed.
- If the software was already erased and the update is interrupted, the bootloader automatically switches between update modes every 5 seconds.
Slow blinking = Computer update
Fast blinking = USB Flash Drive update
We recommend this simple program to connect to the display via the USB cable:
Connect the DataDisplay NextGen to the PC using the USB cable
Start the "HTerm" program.
Apply the following settings as shown in the picture:
Port: The port is different for everyone. If there are several to choose from, unplug the DataDisplay, click on the "R" button to the right of the port selection and see which port has disappeared. Reconnect the DataDisplay, click "R" again and select the port for the DataDisplay
Baud: 115200
Data: 8
Stop:1
Parity: None
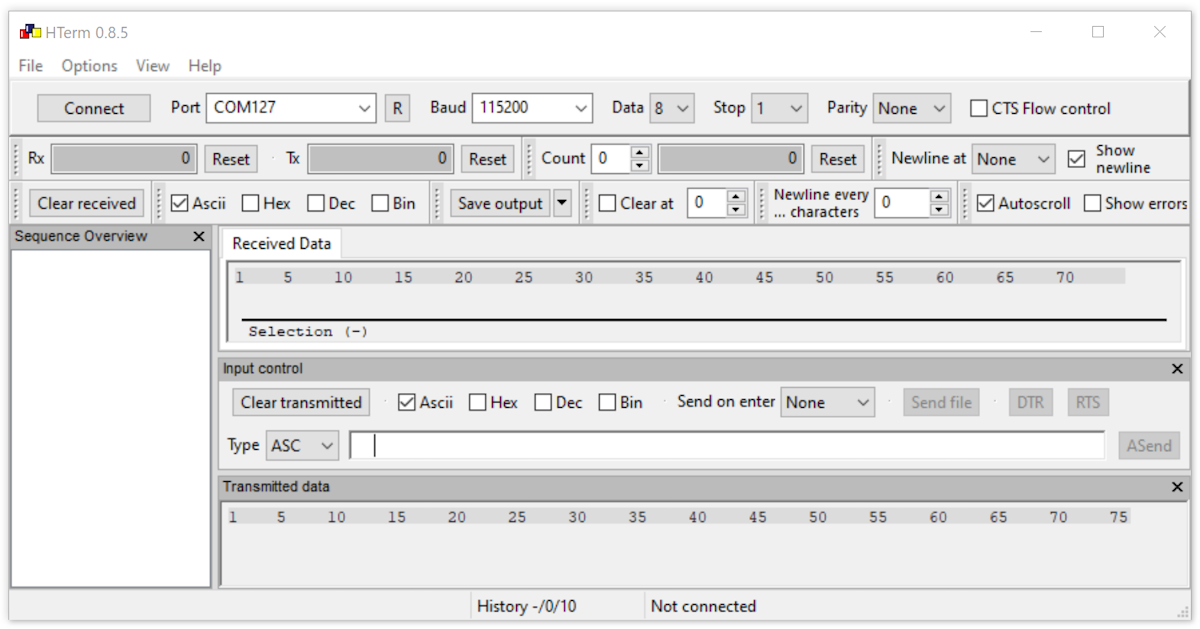
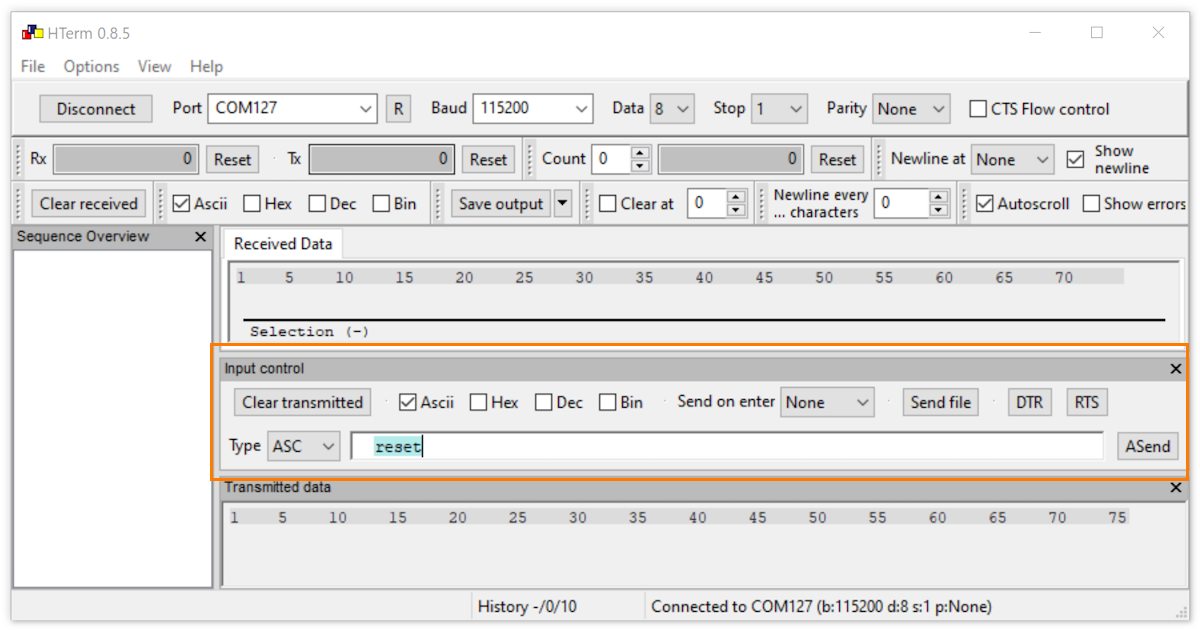
Press the "connect" button at the top left and the connection to the display will be established.
Under "Input control" check the Ascii only box.
Type: ASC
Enter the command "reset" in the input field (as shown in the picture) and press Enter on the keyboard.
The display is now set to factory settings and restarts.
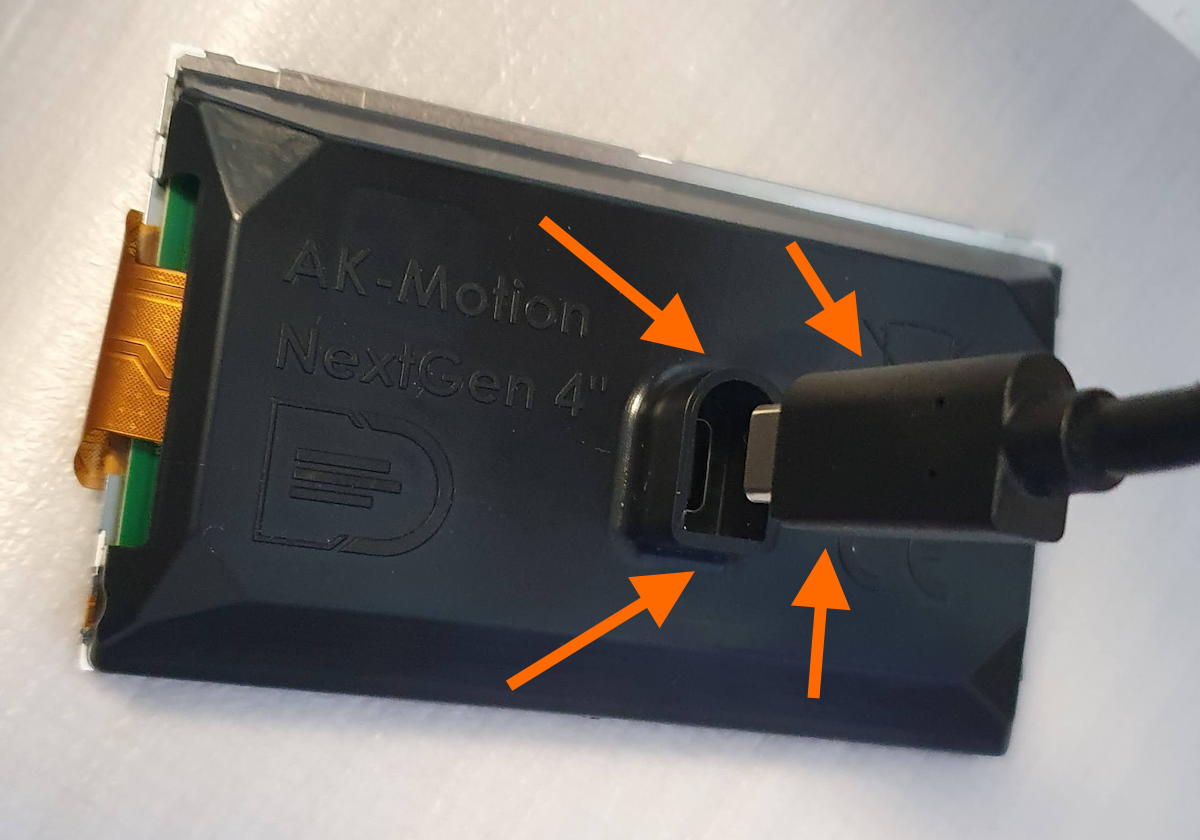
In most cases it is because the plug is plugged in the wrong way round either in the connection box or in the display. This means that the power supply is guaranteed, but not the CAN bus for the data.
Solution: Insert the cable the right way round (flat side to flat side and round side to round side).
The flickering means that the bootloader is active and can accept an update.
If the display runs for some time, the bootloader is told that the application is ok and running.
The actual software (application) is then started immediately and the display no longer flickers when switched on.
If you frequently turn the ignition off and on again, it flickers again because the application hasn't run long enough.
This is a safety feature so that the display can always be updated should something go wrong.